Old School RuneScape players tend to collect a lot of random stuff when adventuring around.
Whether it’s PvM loot, quest rewards, or unique cosmetics that take up their bank slot, many things will fill up your bank if you’re not keeping track of your stuff.
Recommended Read: Old School RuneScape – Level 1-99 Ranged Guide
Organizing your bank can be a tedious task for players not familiar with the different bank mechanics and options available.
In this article, I am going to provide you with some tips and tricks to organize your bank, as well as provide you with an example bank layout that you can mimic to make the process easier. Here are some ways to organize your bank in Old School RuneScape!
Table of Contents
How to Organize Bank in OSRS
To get started, let’s talk a bit about the bank. There are hundreds of booths, chests, and NPCs all over RuneScape that will allow you to access it.
Any player who is trying to look for the closest bank location can look for the bank icon on the world map.
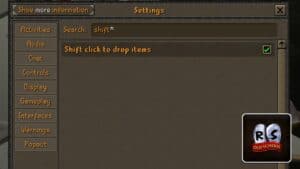
Once you access your bank (hopefully after putting in your secure bank PIN), you will be met with different tabs and buttons that you can use to customize your bank.
Main Bank Buttons:

- Rearrange mode: Changes how items in a bank interact when you move an item around. When set to “Swap”, will directly swap the item with the one that you dragged to that spot. When set to “Insert”, will place the item in that slot and move all following items over by one.
- Withdraw as: Changes how items are withdrawn from your bank, either as a regular item or as a banknote. Very handy when trying to grab multiple of a single item to sell on the Grand Exchange, reorganize your entire bank from scratch, etc.
- Quantity: Sets how many of an item you will withdraw/ deposit in a single click in and out of your inventory.
- Set Placeholders: Activates default placeholders when an item is deposited to a bank. When enabled, items deposited and withdrawn from a bank will create a placeholder, saving a default spot in your bank for that item to go to in the future.
- Bank tags: Currently only available on RuneLite. Allows players to add tags to items so they can quickly access specified items based on a certain tag.
- Menu button: How to access the bank settings menu.
Bank Settings Menu:

- Tab display: Changes how bank tabs are labeled.
- Incinerator: When active, an Incinerator will appear at the bottom right corner of your bank, which you can use to destroy unwanted items.
- Bank Tutorial button: When active, a button with a question mark appears at the top right of your bank menu, which you can use to get a brief rundown of the bank menu.
- Inventory item options: When active, any options that are available for an item in your inventory (other than deposit options) will still be available. I.e. if you have a Rune Platebody in your inventory with this option enabled, you will be able to right-click and “wear” it.
- Deposit inventory button: When active, a button to deposit your entire inventory will appear.
- Deposit worn items button: When active, a button to deposit everything you are wearing will appear.
- Release all placeholders: This button displays the number of placeholders you have in your bank. When you click to release placeholders, all of them will be cleared out. Wait until you are absolutely sure you want to do this as this can ruin your bank organization if you are not careful.
- Bank Fillers: Can add “null” items to fill certain slots in your bank. Handy when trying to create a specific layout in your bank but are missing one or two items and need something to fill the space.
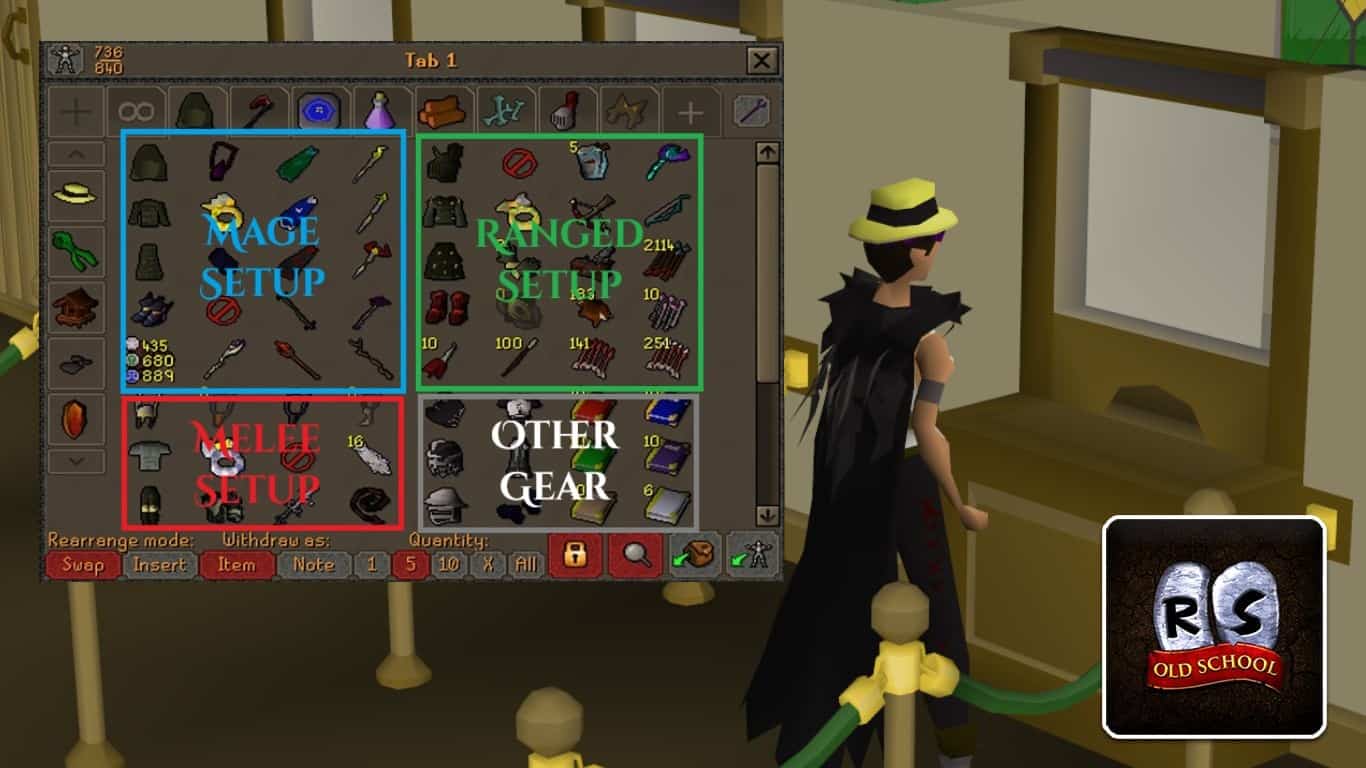
Organizing Your Bank

Now that you are familiar with the different bank options let’s discuss the process of organizing your bank.
The general rule of thumb that most players follow is to have each tab represent a certain category of items. Gear setup, PvM supplies, loot, skilling gear, the sky is the limit to how you want to categorize each tab.
In the example I have here, I have my “currency and achievements” tab first, gear second, skilling tools third, and so on and so forth. Within each of these tabs, I also organize it by the subcategories for items.

In my skilling loot tab, I have all the different woodcutting drops in one section, mining loot in the second portion, and then fishing, farming, and other skills towards the bottom.
The goal is to be able to clearly see which section is which so you can quickly see what you are looking at when viewing each tab.

You might also consider a “junk” tab, where you have one tab dedicated to random items that might have no specific category/just randomly fill space.
This is handy so you don’t have any unnecessary clutter at the bottom of your other tabs.
In general, the rules you should follow are this:
- Dedicate each tab to a specific category of items.
- Within each tab, place and arrange items in a manner that categorizes them together.
- Have your first couple of tabs contain items that you frequently use/ have common items towards the top of the tab.
- Items that are frequently used together should be placed together.
- If you are using bank tags, organize them based on common activities that you do in the game.
That is how to organize your bank in Old School RuneScape!
Do you have any input or suggestions for this guide? Let us know in the comment section below.