In Project Zomboid, mods add more content and features to the original game, making them a must-have for many players.
However, installing mods can be challenging for some players, especially if they play the game on different platforms besides Steam or use unofficial versions.
Recommended Read: 16 Best Mods for Project Zomboid
In this guide, we’ll guide you on how to install mods in Project Zomboid on various platforms, as well as the steps to enable them.
Installing mods varies depending on the platform you’re playing on.
If you’re using Steam to play Project Zomboid, you can simply subscribe to a mod, and Steam will automatically download and install it. If you’ve purchased the game from GOG or HumbleBundles, you’ll need to manually download the mods and place them in the game’s mods folder.
Table of Contents
How to Install Mods in Project Zomboid
Here are the ways to install mods in Project Zomboid for both Steam and GOG or HumbleBundles players.
For Steam Players
If you choose to play Project Zomboid on Steam, fortunately, you can install mods quickly with just a single mouse click.
First, select Project Zomboid in your library and click the Workshop tab on the nav bar right below the Play button. You can also access Project Zomboid’s workshop via browsers.
Once you’re at the Workshop, feel free to pick any mod you like, click on it, and click the Subscribe button on the mod’s detail page.
If you’re in-game, close it to let Steam automatically download and install the subscribed mods for you.
For your information, the downloaded mods are installed in:
- PC: [YourDisk]:\Steam\steamapps\common\ProjectZomboid\steamapps\workshop\content\108600\[ModID]\mods\[ModFolders]
- Mac: ~/Library/Application Support/Steam/steamapps/workshop/content/108600/[ModID]/mods/[ModFolders]/
- Linux: ~/.steam/steam/SteamApps/common/workshop/content/108600/[ModID]/mods/[ModFolders]/
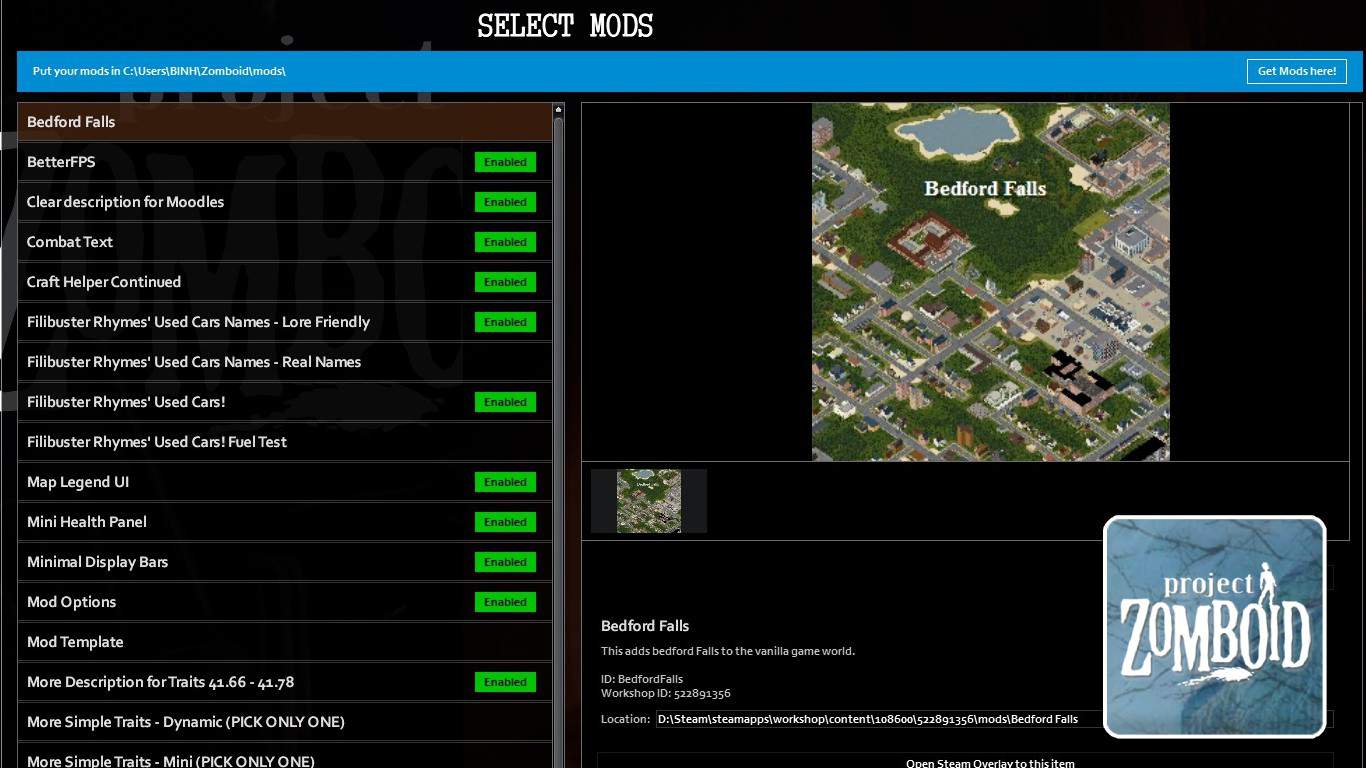
Finally, launch the game and go to the Mods menu to enable the mods you want.
To install mods for your server, download the mods using the above method and click “Host”. Then click “Manage Settings”, pick your server on the left panel, then click “Edit Selected Settings”.
In the following menu, click the Steam Workshop tab and add your desired mods. Then, go to the Mods tab below and add the mods again.
For GOG or HumbleBundles Players
If you buy Project Zomboid from GOG or HumbleBundles, use this website to download mods from the Steam Workshop. Then, just paste the mod link and follow the instructions on the website linked above.
Once you have the mod files, copy the mod folders of your downloaded mods to the mods folder in the Zomboid folder. The mods folder can be found at:
- PC: C:\Users\[YOURNAME]\Zomboid\mods
- Mac/Linux: ~/Zomboid/mods
To play with mods, simply launch Project Zomboid and enable the mods using the same method as above.
That’s how to install mods in Project Zomboid.
Have any suggestions for this guide? Let us know in the comment section below.