Sheet Rope is one of the most valuable strategic items in Project Zomboid. Using it, you can prevent the undead from ascending to your floor and create a safe, injury-free escape route in a multi-floor building.
With these advantages, how do you properly place Sheet Rope in Project Zomboid?
Recommended Read: How to Cut Down Trees in Project Zomboid
In Project Zomboid, placing the Sheet Rope requires a Hammer and 1 Nail. First, right-click on the window and select “Open Window” or press “E” when you stay next to it. Then, right-click on the window again and select “Add Escape Sheet Rope (Fabric)”.
Table of Contents
How to Place Sheet Rope in Project Zomboid
In addition to its primary function of descending between floors, you can also use the Sheet Rope to enter the building or stack logs for better transportation.
However, attaching the Sheet Rope to the floor isn’t as straightforward as it may seem. It involves multiple steps and specific materials.
Therefore, let’s explore how to craft Sheet Rope and what are the required materials first!
Prerequisite Tools and Materials
Here is the list of materials and tools you need for crafting and attaching the Sheet Rope in Project Zomboid:
- Sheet or Clothing: Sheet Rope can be crafted from either sheets or clothing items. Regardless of their condition, it’s advisable to choose old or torn ones.
- Hammer: you need a Hammer to place the Sheet Rope in the window.
- Nail: each attempt to attach the Sheet Rope costs 1 Nail.
Once you have the materials, right-click on your pieces of clothing or Sheet and select “Craft Sheet Rope” to make Sheet Rope.
Now, ensure you’ve got at least one Nail and the Hammer, then head to the higher floors (if you’re on the ground) and be ready to place Sheet Rope.
Let’s Place Sheet Rope!
First and foremost, it’s worth noting that you can’t attach the Sheet Rope to a window on the first floor. In other words, the Sheet Rope can only be attached to windows starting from the second floor and above.
Next, ensure that the area around you is free of zombies, as attaching the Sheet Rope creates noise, and the undead can attack you while you’re attaching it.
The Sheet Rope can be attached when the window is opened. In that case, right-click on the window and select “Open Window” or press “E” when you stay next to it.
If the window is locked, you can break it by right-clicking and selecting “Smash Window”.
However, this action creates noise, and the broken pieces of the window can hurt you after descending, especially if you’re walking with your bare feet.
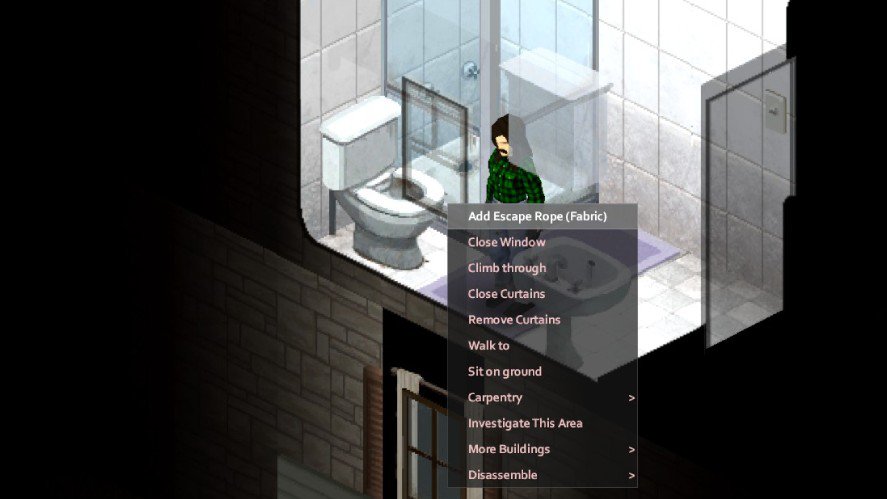
Next, right-click on the window and select “Add Escape Sheet Rope (Fabric)”. If this option is unavailable, you can check out whether you’re in the following cases:
- You don’t have the Hammer or at least 1 Nail in your inventory.
- You’re not on the second or above floor.
- You select a window that is on the side with the first-floor roof. Climbing through that window will lead you to the roof of the first floor instead of descending to the ground.
After that, right-click on the window and select “Climb Through”. Alternatively, you can hold “E” when staying nearby to climb through the Sheet Rope.
You can retrieve the Sheet Rope by right-clicking on it and selecting “Remove Escape Rope”. Although zombies can’t climb through it, they can destroy it.
Additionally, fire can burn the Sheet Rope to ashes, so avoid using Molotov cocktails near the window you intended to use as an exit.
That’s how to place Sheet Rope in Project Zomboid!
Have any suggestions for this guide? Let us know in the comment section below.